My Creative Team Hiatus is Finally Over

I’m happy to say my creative team hiatus is finally over.  I believe I’ve found my happy place. By nature, I prefer things organized and I like to know what’s expected of me.  Check and check. At the same time, it’s great to be among people with the same interests, that love scrapping and want to have fun.  Check, check, check.  And to put a little icing on the cake, I get to work with my favorite designers and my favorite store!  Can’t beat that.

The Digichick, and all the creative chicks that work behind the scenes have got it goin’ on. The CT call I’ve been waiting finally called,  I applied immediately and waited on pins and needles for their decisions.  When I opened my email Tuesday morning I was so excited to find I’d been accepted to the team.  Woot! Woot!

You can expect to see a lot of layouts and news about new releases, challenges, special events and all things Digichick.  One of the new releases today is Smooch by Sas Designs.  Just in time for you to scrap some layouts of the ones you love and it’s on sale right now.

Love!

I used Kimeric Kreations February Fan template for this layout.   Here are the links:


Font Challenge February 2016

I love fonts and font challenges!  Shopping for fonts is right up there with shopping for shoes or purses for me.  Font challenges are great because someone else does all the work.  Usually there is a list with several fonts that they think are cool.  They provide the links and all I have to do is download any I want & post a layout using one or more.  Easy peasy!

I made the layout below for the font challenge at The Digichick.  If you aren’t participating, you should.  They have great challenges every month in their forum.

Boys Will Be Boys

The kit is Boys Will Be Boys by Kimeric Kreations.  The font is H&B Sketch Demo.

My Memories Suite New Version 7 is Available Now

New-Software-MyMemoriesSuite7

My Memories Suite new version 7 is now available.  Here are some of the new features to look forward to in this new release:

mmsv7_new-features-overview

Over the next few weeks, I’ll be reviewing MyMemories new v7 software and going into more depth with some of my favorite new features.  Are they a hit or a miss?  We’ll see!  If you don’t currently use MyMemories Suite you can give it a try now and save money.  Copy this code STMMMS57865 and paste it in as a coupon code at checkout.  You’ll save $10 & receive coupons for future store purchases.

Keep an eye out for my reviews and tutorials using MyMemories Suite version 7.

Top 5 Tips to Achieve Perfect Cluster Groups

Cluster groups are a scrapbook technique that baffles many scrappers.  Cluster groups are a great way to use some of the gorgeous embellishments included in kits and collections while improving the look of a scrapbook page layout.

Here are five key components to consider to achieve beautiful cluster groups.

  1. Repeat elements:  embellishments, papers, shapes, and colors.
  2. Odd numbers work best.  Three or five items always look better than two or four.
  3. Triangular arrangements work great in cluster groups and layout design.
  4. Place elements under, between and above photos and papers.
  5. Use clusters to move your eye around the page.

If you find it difficult to arrange clusters, try finding layouts or pre-made clusters that you like and study how the key components are applied.  Practice replicating the look in your own layouts.

First add several elements to use on a layout.  Then try multiplying, resizing, rearranging, and relayering to get the desired effect.  After all that if something just doesn’t seem to work, delete it.  As with anything new, it takes practice.  Since everything is digital it makes it super easy to practice.

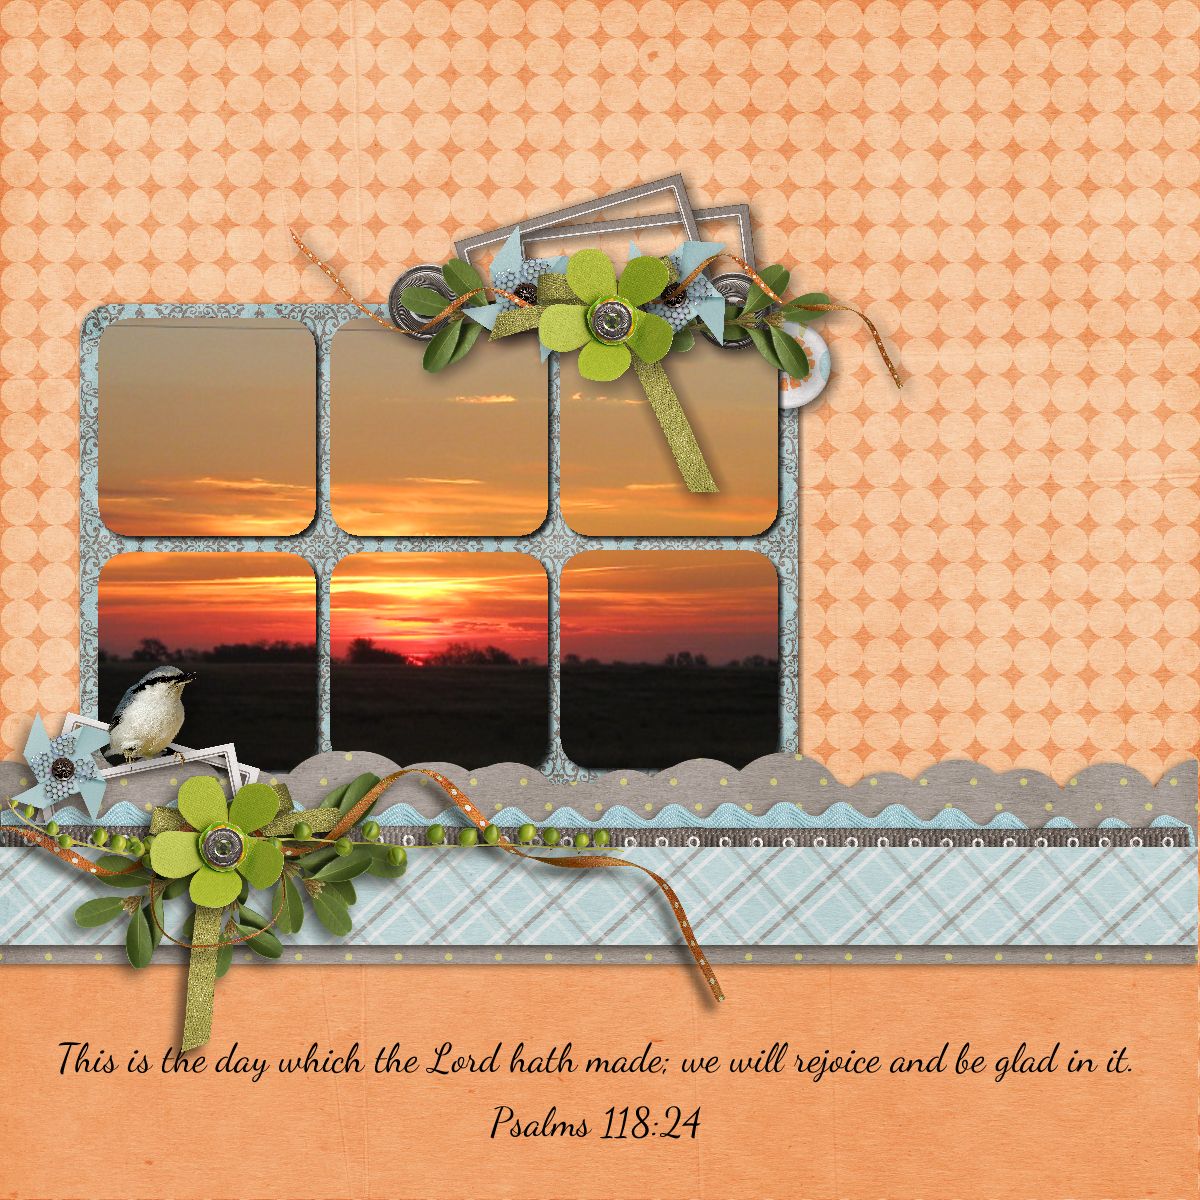
Let’s explore a pre-made cluster.  A member of KimericKreations CT made this cluster using Kim’s Rustic Autumn kit.

cluster example

  1. The triangular shape is still apparent even in a more vertical design.
  2. Flower clusters-3 blue, 3 gold & 3 maroon flowers grouped and repeated 3 times.
  3. Blue leaves repeated 3 times.
  4. Banner flags-3 maroon flags, 3 plaid flags, 3 grey flags.
  5. Gold color repeated in heart & paint splatters at the top and middle, word art in the middle & circles at the bottom which also repeats the circular shape at the top and the clock in the middle.

When planning a cluster group it helps to copy/paste a minimum of three of each of the main items you plan to include.  Place them over to the side to start.  Then rotate and group some of them and place them in the general areas to make a triangle.  Some items, such as a single flair & single clock, work because the circular shape is repeated.

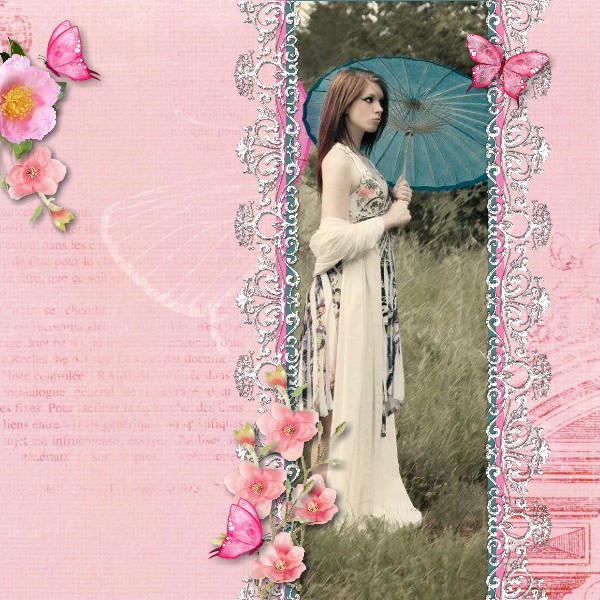
Now let’s look at a layout.  Instead of one cluster group, three groups create flow.

Slim vertical photo layout

Notice the general layout is triangular.  The cluster group on the top left, the butterfly on the top right and the clustering at the bottom use the five key components to move the eye around the layout.  Each cluster has an odd number of elements, three on the left, one on the right and five at the bottom.  The blue ribbon on each side of the photo ties in the blue umbrella.

If you are having trouble achieving beautiful cluster groups, try these five tips and see if they help.

Top 10 Reasons to Love Digi Scrapping

Today I want to share my top ten reasons to love digi (digital) scrapping.  They are in no particular order and there could easily be ten more.

  1. I love making everyday moments into memories of a lifetime.
  2. There is not a bunch of supplies to drag out before I can start creating.
  3. There is no mess to clean up (except filing downloads on your computer).
  4. It’s green!  There is no waste and everything is recyclable.
  5. Kits and collections can be mixed and matched and used over and over again.
  6. I can do it anytime, anywhere.
  7. It’s so much better than photo albums because stories are recorded too.
  8. There is no tedious cutting and pasting.
  9. It’s easy to arrange, rearrange or start completely over if I don’t like a result.
  10. They make great gifts.  A gift that keeps on giving!

photo of gift

Put smiles on some faces this year and next.  Scrapbooks make wonderful gifts for any season. Individual pages are also great gifts.  There are so many different gift ideas such as prints (framed or unframed), posters, canvas prints, calendars, cups, blankets and pillows to name a few.

What are your top ten reasons for digi scrapping?

How to Use the Rule of Thirds in Scrapbooking and Photography

The rule of thirds is a design principle that applies in all areas of creativity.  I wrote a post about using the rule of thirds in scrapbook design over two years ago.  You can find that post and some layouts using this rule here.  It actually comes quite naturally because it’s so aesthetically pleasing to our senses.


Today I found an article about using the rule of thirds in photography.  Photography is another creative area that most scrappers are compulsive about.  Read that article here.


We all know rules are made to be broken, right?  Yes, it’s easier to apply this rule when designing a scrapbook layout than in photography sometimes.  But do keep this in mind in your scrapping and photography endeavors.  Learn how to use the rule of thirds, practice it and watch your layouts and photography skills improve.  There’s a good reason rules are rules because they work!

Learn How to Use Photo Tiling in MyMemories Suite v6

I remember when photo tiling was first added to MyMemories Suite. I could hardly wait to learn how to do it.  I thought it was the coolest feature ever.  It’s very easy to do and really adds something special to a layout.  I recently wrote a tutorial about using the Group tool.  Photo tiling is one of the effects that uses the Group tool.  Below is a page from the tutorial.  You can find the complete tutorial here.

Grouping Elements Tutorial-010

When grouping animals or people be careful not to chop them up!  That is just not right, lol.  Here’s a page I made quite a while ago.  As you can see, it’s sometimes difficult not to chop off a shoulder or some hair.  Remember, you can always ungroup the photo and tweak the placement of each separate piece. But please don’t split anyone down the middle!

Photo Tiling in My Memories

Landscapes are pretty safe though and look really neat.

Sunrise

Learn How to Group Alphas in MyMemories Suite v6

I often group items in MyMemories Suite to make some tasks easier.  Alphas are one of my favorite things to use.  Some designer’s kits include really cute alphas.  For a long time, I didn’t use them.  One reason was because it took a lot of time and effort to get them all the same size and lined up just right.  But now MyMemories makes it so easy to line them up, space them evenly and then group them.  Once grouped they’re treated like a single element.

Here’s a page from the Grouping Elements tutorial I wrote.  In this section, you’ll learn just how easy it is to align, space, and group alphas.

Grouping Elements Tutorial-012

This is just one of the many things you can do using the Group tool.  You’ll find the complete tutorial here.

I’d love your feedback.  Please comment to let me know if you learned anything new and how you plan on using the Group tool in one of your projects.

Complementary Colors Pop

Creating contrast using complementary colors is a wonderful tool seen in many areas of design. Scrappers are also avid photographers.  As a photographer, you will appreciate this article about adding contrast to your images using complementary colors.  You can find the article here.


Get more in-depth information about color theory here.   You may already use color theory to enhance your photos and scrapbook layouts without even knowing it.  These color contrasts are all around us in nature and become intuitive.


If you’re not already using complementary colors in your designs you should start doing it now. This is one “secret” that will make your work stand out.  It’s the added pop you’ve been looking for.