Category Archives: MyMemories

Have the Courage to Cluster

Scrappers should not fear embellies and clusters.  Done right they will take your layouts to the next level.  But there is a right way and a wrong way.  One little flower on a page just gets lost and personally I think bigger is better.  Check out this article for ideas on adding embellishments and clustering on your layouts for a whole new look.  Now even if I don’t change your mind about adding more embellishments to your layouts, it’s good to step out of your comfort zone occasionally and see what you can do.  As for me, I do have a few, a very few, layouts that are fairly minimal so I have stepped out of my zone too!

Ice Cream   Ice Cream Makes Me Silly

I think the layout on the right does a better job expressing the fun and silliness shown in the photos.  Do you agree?

Credits: Sundance kit by Laitha Designs.  Fonts: Pupcat, KC This Is Not Goodbye, Dancing Script, Taiga, and Patterns & Dots.

Basics Training Series

I’ve started a series of “basics” training articles comparing MyMemories Suite and MemoryMixer.  In the first article, posted today, we’ll compare prices, discounts available, system requirements, and briefly touch on the features of each program.  Many people have had questions regarding the differences and want to know which to buy.  I will dig deeper as the weeks go by and hopefully answer any questions you may have.  If you have a question you’d like answered, please comment on this post and I’ll do my best to be sure to cover it.  I hope you enjoy this series and covet any feedback or suggestions.  Next week we’ll look at the features of each program in more depth.  Check back often or follow my blog to keep up to date.  You’ll find the first article under the Basics Training tab or click here.


Basics Training Badge

Eeek! Snake!

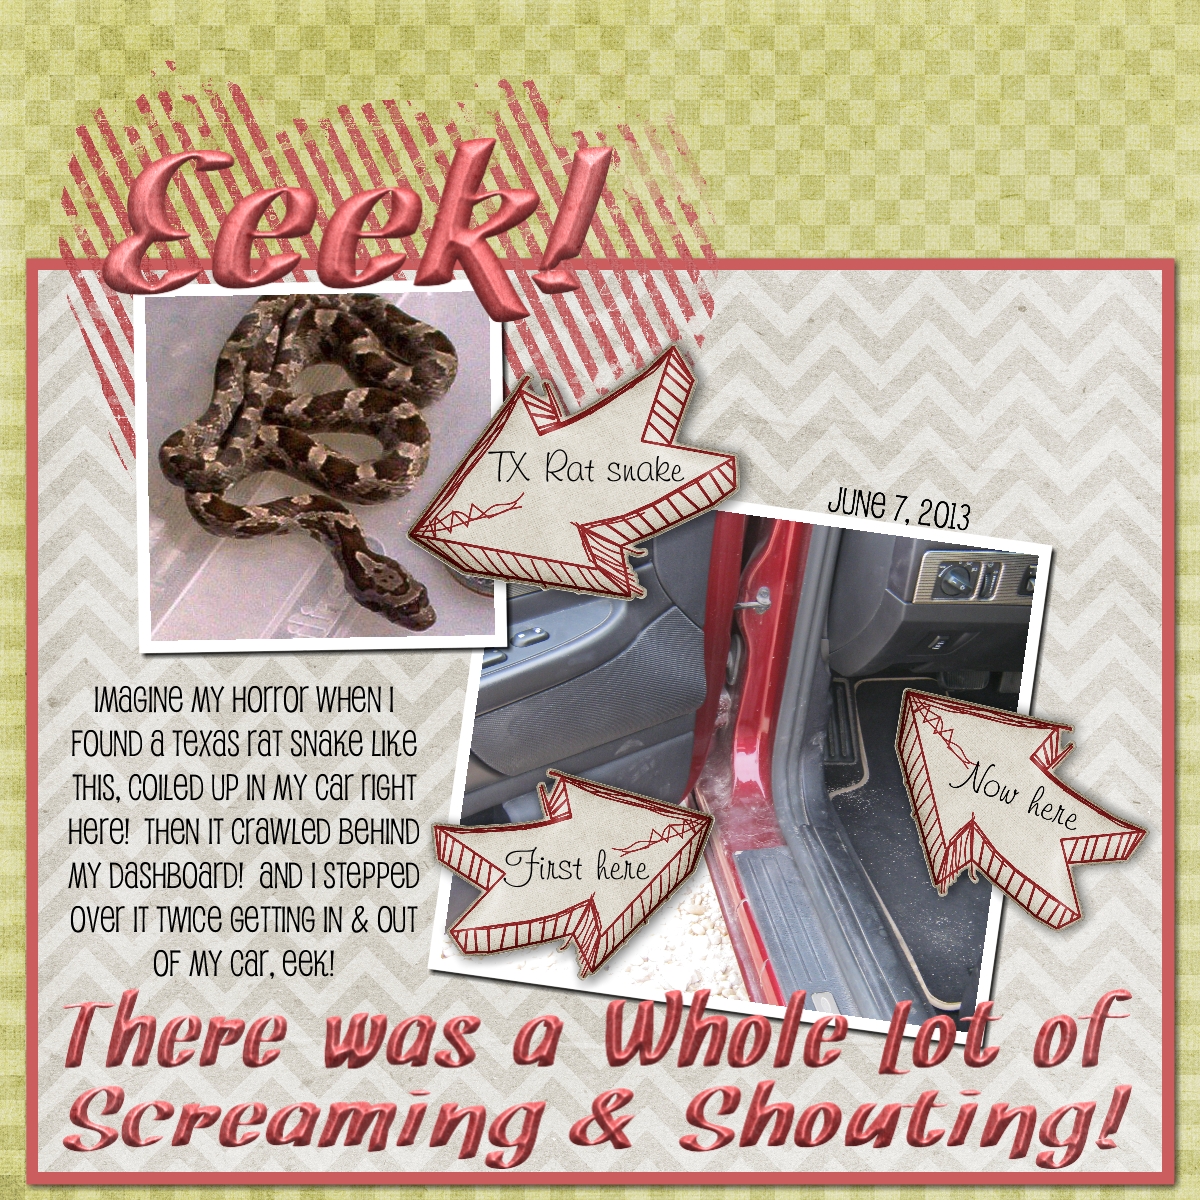
My Fridays aren’t usually so exciting!  I had to go into town, about 30 miles round trip, to go to the bank.  I decided to take my sports car because I hadn’t driven it in about three weeks.  I had decided to drive it to church Sunday so I thought I’d top off the tank.  I pulled up to the pump then turned around to shut the door.  Something caught my eye which, to my horror, turned out to be a snake coiled up in the door frame of my car! 

I heard myself saying Oh My God, Oh My God, Oh My God!  A lady two pumps over asked if I was okay to which I replied, No! There’s a snake in my car, Oh My God, Oh My God, Oh My God! This apparently woke the snake and he proceeded to slither INTO my car, up the floor mat and behind the dash board.

A man pulled up on the other side of the second pump down.  Thankfully, he used to be a biology teacher and LIKED snakes.  From my description he said it sounded like a Texas Rat snake.  He got his flashlight and tried to locate the snake but couldn’t see it.  He assured me it was more scared than me but I assured him that wasn’t possible.  He told me I’d be safe to drive home.  He was “sure” the snake wouldn’t come out BUT if it did, it’s not poisonous. 

Everyone went on their way except me.  I couldn’t figure out what to do.  I knew I couldn’t drive the car home.  My husband was out of town so I couldn’t call him.  I could leave it there and call a cab or maybe have it towed home.  While I was trying to think a truck pulled up beside me and the former biology teacher offered to let me drive his truck home and he’d follow in my car.  No, I didn’t know this man but the lady from the second pump down knew him.  She taught special ed and would take groups of children to a facility that he ran.  I jumped at the offer!

Here is a layout I made.  The snake in the layout is not the snake from my car.  The one in my car was much smaller and it may still be in my car for all I know!  But when this was going on I didn’t have time or even think about getting that rascals picture!

Thank God for sending that man to rescue me.  Yes, God still answers prayer!

Snake!

Sun Ray Template Challenge

I made this for the DigiScrappingDivas challenge using the template freebie from Little Kiss Creations.  The background paper is Pamela Yates/Ready for Spring.  Everything else is J W Designs/Spring Has Sprung.  If you haven’t tried any of the challenges you’re missing out.  I thought this one was particularly fun but there’s something new everyday.  Here’s my layout…

DigiScrappingDivas SunRay Challenge

Design Principles Rule of Thirds

Some of the best photos, paintings and layouts are composed using a guideline called the rule of thirds.  Basically, you divide your “canvas” into equal parts horizontally and vertically.  Then you place your focal point along the lines dividing you composition, as in the illustration below.

Rule of Thirds

If you were taking a picture of a landscape you might place the horizon along the lower horizontal line.  This will result in a more interesting composition than if you placed it smack dab in the middle of the page.  In the layout below you’ll notice this principle is used twice.  In the sunrise photo the horizon is placed on the imagined lower third and the photo as the focal point is centered vertically on the left third and the blue/grey elements & base of the photo are in the lower third.

Sunrise

The next two layouts use the rule of thirds again.  In addition, you may notice I cluster elements in a way to maximize flow.  I want to lead your eyes around the page while drawing attention to the focal point.  More about that in a future article.

Love  Bathing Beauty

Credits: Thirds layout made in Memory Mixer using Kimeric Kreations/Denim & Lace.

The remaining layouts made in MyMemories Suite

Sunrise layout using MMS Designer/Spring It On

Love layout Kimeric Kreations/Take Note

Bathing Beauty layout Kimeric Kreations/Summer Sunset

Photographer Linda Blackwell

There's More to Photo-Tiling Than Just Photos

I just posted a tutorial for a new feature of My Memories Suite v4.  It’s my favorite new feature and I’ve used it a lot.  I also like to do color-blocking in layouts and it finally occurred to me that I could probably use the photo tiling for color blocking as well.  After all there is technically no difference between a photo or a background paper.  So I’ve done a tutorial to show you how to do it too.  Please let me know if you find it beneficial.  You can also let me know if you have any questions.  Either way I hope to hear from you.  Click here to check out the tutorial.

I’ve also written a review of this feature at DigiScrappingDivas.com.  If you’d like to read my brief review you’ll find it here.  Happy Scrapping!

Perfect!

Today’s challenge word on Digi Scrapping Tips .com is “Perfect”.  I made this layout of my son, granddaughter & his girlfriend because through my eyes they’re perfect 🙂  I know nobody is perfect but when you love someone you can forgive anything that’s less than perfect.  When the picture was taken they were barbequing and smoke filled the air.  I cleaned the picture up using picmonkey.  Gizaa designed the kit I used.  It’s called Cool and was a freebie I got at digiscrappingfreebies.com.  The alpha I used for the word perfect is Toot Sweet Alpha by Jen Yurko.  The words were completed using a font called Mister Sirloin BTN Rare.  The words I used describe our attitudes toward each other & life.  I am so thankful for them.

My Perfect Family

We Wish You a Merry Christmas!

We Wish You a Merry Christmas

Another Christmas tree created in MyMemories Suite using a border shape from Albums to Remember.  For this one I stacked and filled a few border shapes facing one direction then mirrored the shape, stacked and filled again.  The kit I used is Christmas Memories from Touched By a Butterfly.  Don’t you just love this kit?  You can get it here.

If you’d like to try your hand at designing your own Christmas trees you can find my tutorial here.

If you would love to get MyMemories Suite to use for all your creative ideas you can find it here.  Use the promo code below for super savings!

Use this promo code STMMMS57865 at checkout to save $10 and get $10 to spend in the store.